.NET을 이용해 다른 Native 애플리케이션에서 사용할 수 있는 COM을 만들 수 있다.
오늘은 어떻게 .NET을 이용해 COM 구성요소를 만드는지 연구해 볼 것이다.
이번에 Sample로 만들어 볼 COM 구성요소는 Triple DES를 이용한 문자열을 암/복호화 이다.
자 Step By Step으로 따라 하면 COM 구성요소를 만들 수 있을 것이다.
COM 구성요소 만들기
- Visual Studio 에서 새 프로젝트를 생성합니다.
-
새 프로젝트는 클래스 라이브러리 템플릿을 이용합니다. 프로젝트 이름은 Sample.Crypto 로 합니다.
- 프로젝트를 만든 후 프로젝트 속성 화면을 엽니다.
-
처음 보이는 탭인 "응용 프로그램" 에서 "어셈블리 정보" 버튼을 클릭 한 후 "어셈블리를 COM에 노출(M)" 의 체크 박스를 체크 한 후 확인 버튼을 클릭 합니다.
이 속성을 설정해야 만 COM 으로 노출이 가능하다. 이 속성을 설정 하지 않으면 이 어셈블리 형식이 COM 구성 요소에 표시 되지 않는다. COM에서 이 어셈블리의 형식에 접근하려면 해당 형식에 대해 true를 설정 되어야만 한다. 여기서 설정한 것은 결국 프로젝트의 AssemblyInfo.cs 파일의 내용이 수정되는 것으로 [assembly: ComVisible(true)] 속성 설정을 하게 되는 것이다.
-
다음 프로젝트 속성의 서명 탭으로 이동해 현재 어셈블리를 서명 한다. 어셈블리는 서명하는 이유는 COM 구성 요소를 등록 된 후 어셈블리가 호스팅 될 때 어셈블리를 쉽게 찾기 위함 이다. 물론 서명을 하지 않아도 COM 구성 요소 등록 시 CodeBase를 지정하거나 혹은 현재의 COM 을 호출 하는 애플리케이션과 같은 폴더에 존재 하면 되지만 어셈블리도 보호하고 쉽게 가기 위해 어셈블리를 서명 하도록 하자.
- 이제 기본적으로 COM 구성 요소로 노출 할 수 있는 기본 작업은 끝났다. 이제 Triple DES 암/복호화 클래스를 간단히 구현해 보자.
- 먼저 Triple DES 관련 클래스를 만들기 위해 TripleDESAgent.cs 클래스를 프로젝트에 추가 한 후 아래와 같이 코딩을 한다. .NET Framework에 있는 Triple DES 클래스를 이용해 좀 더 쉽게 사용할 수 있게만 구현 한 것이라 특별히 설명하지 않는다. 다만 이 클래스를 구현할 때 신경 썼던 부분은 해당 네임스페이스에서만 사용할 수 있게 internal 한정자를 사용하였다.


|
using System; using System.Collections.Generic; using System.Text; using System.Security.Cryptography;
namespace Sample.Crypto { /// <summary> /// Triple DES 암/복호화 클래스 /// </summary> internal class TripleDESAgent : IDisposable { #region Member Variables
/// <summary> /// Triple DES 암호화 프로바이더 멤버변수 /// </summary> private TripleDESCryptoServiceProvider m_Provider = null;
#endregion
#region 생성자
/// <summary> /// Triple DES Agent 생성자 /// </summary> internal TripleDESAgent() { m_Provider = new TripleDESCryptoServiceProvider(); m_Provider.KeySize = 192; m_Provider.BlockSize = 64; m_Provider.Mode = CipherMode.CBC; m_Provider.Padding = PaddingMode.PKCS7; }
#endregion
#region IDisposable 멤버
/// <summary> /// 사용 중인 리소스 해제 /// </summary> public void Dispose() { if (m_Provider != null) { m_Provider.Clear(); m_Provider = null; } }
#endregion
#region Encrypt
/// <summary> /// 평문 암호화 /// </summary> /// <param name="plainText">평문</param> /// <returns>암호문 반환</returns> internal byte[] Encrypt(byte[] plainText) { byte[] encrypted = null;
try { using (ICryptoTransform cryptor = m_Provider.CreateEncryptor()) { encrypted = cryptor.TransformFinalBlock(plainText, 0, plainText.Length); } } catch { throw; }
return encrypted; }
/// <summary> /// 평문 암호화 /// </summary> /// <param name="plainText">평문</param> /// <param name="Key">Triple DES Key</param> /// <param name="IV">Triple DES IV</param> /// <returns>암호문 반환</returns> internal byte[] Encrypt(byte[] plainText, byte[] Key, byte[] IV) { byte[] encrypted = null;
try { m_Provider.Key = Key; m_Provider.IV = IV; encrypted = Encrypt(plainText); } catch { throw; }
return encrypted; }
#endregion
#region Decrypt
/// <summary> /// 암호문 복호화 /// </summary> /// <param name="cipherText">암호문</param> /// <returns>복호화 평문 반환</returns> internal byte[] Decrypt(byte[] cipherText) { byte[] plainText = null;
try { using (ICryptoTransform decryptor = m_Provider.CreateDecryptor()) { plainText = decryptor.TransformFinalBlock(cipherText, 0, cipherText.Length); } } catch { throw; }
return plainText; }
/// <summary> /// 암호문 복호화 /// </summary> /// <param name="cipherText">암호문</param> /// <param name="Key">Triple DES Key</param> /// <param name="IV">Triple DES IV</param> /// <returns>복호화 평문 반환</returns> internal byte[] Decrypt(byte[] cipherText, byte[] Key, byte[] IV) { byte[] plainText = null;
try { m_Provider.Key = Key; m_Provider.IV = IV; plainText = Decrypt(cipherText); } catch { throw; }
return plainText; }
#endregion
#region CreateKey
/// <summary> /// Triple DES Key 생성 /// </summary> /// <returns>Key 반환</returns> internal byte[] Createkey() { byte[] key = null;
try { m_Provider.GenerateKey(); key = m_Provider.Key; } catch { throw; }
return key; }
#endregion
#region CreateIV
/// <summary> /// Triple DES IV 생성 /// </summary> /// <returns>IV 반환</returns> internal byte[] CreateIV() { byte[] iv = null;
try { m_Provider.GenerateIV(); iv = m_Provider.IV; ; } catch { throw; }
return iv; }
#endregion } } |
- 다음으로 COM 구성요소로 노출할 CipherHelper.cs 클래스를 프로젝트에 추가 한 후 아래와 같이 코딩을 한다.
|
using System; using System.Collections.Generic; using System.Text; using System.Reflection; using System.Runtime.InteropServices; using Microsoft.Win32; using System.Security.Cryptography;
namespace Sample.Crypto { /// <summary> /// Tripe DES Helper Class로 COM 구성요소로 등록 /// </summary> [ProgId("Sample.Crypto")] [Guid("781C3FAF-C274-4865-A2F8-C87CE5F2E2AF")] public class CipherHelper { #region Encrypt
/// <summary> /// 평문 암호화 /// </summary> /// <param name="plainText">평문</param> /// <param name="key">Triple DES Key (Base64 Encoding)</param> /// <param name="iv">DES IV (Base64 Encoding)</param> /// <returns></returns> public string Encrypt(string plainText, string key, string iv) { string result = string.Empty;
try { using (TripleDESAgent agent = new TripleDESAgent()) { byte[] bText = Encoding.Default.GetBytes(plainText); byte[] bKey = Convert.FromBase64String(key); byte[] bIv = Convert.FromBase64String(iv); byte[] cipherText = agent.Encrypt(bText, bKey, bIv);
result = Convert.ToBase64String(cipherText); } } catch { throw; }
return result; }
#endregion
#region Decrypt
/// <summary> /// 암호화문을 평문 /// </summary> /// <param name="cipherText">암호문</param> /// <param name="key">Triple DES Key (Base64 Encoding)</param> /// <param name="iv">DES IV (Base64 Encoding)</param> /// <returns></returns> public string Decrypt(string cipherText, string key, string iv) { string result = string.Empty;
try { using (TripleDESAgent agent = new TripleDESAgent()) { byte[] bText = Convert.FromBase64String(cipherText); byte[] bKey = Convert.FromBase64String(key); byte[] bIv = Convert.FromBase64String(iv); byte[] plainText = agent.Decrypt(bText, bKey, bIv);
result = Encoding.Default.GetString(plainText); } } catch { throw; }
return result; }
#endregion
#region GetKey
/// <summary> /// Triple DES Key 생성 /// </summary> /// <returns></returns> public string GetKey() { string result = string.Empty;
try { using (TripleDESAgent agent = new TripleDESAgent()) { byte[] bKey = agent.Createkey(); result = Convert.ToBase64String(bKey); } } catch { throw; }
return result; }
#endregion
#region GetIV
/// <summary> /// Triple DES IV 생성 /// </summary> /// <returns></returns> public string GetIV() { string result = string.Empty;
try { using (TripleDESAgent agent = new TripleDESAgent()) { byte[] bIv = agent.CreateIV(); result = Convert.ToBase64String(bIv); } } catch { throw; }
return result; }
#endregion
#region For Registration
[ComRegisterFunction()] public static void RegisterClass(string key) { // Strip off HKEY_CLASSES_ROOT\ from the passed key as I don't need it StringBuilder sb = new StringBuilder(key); sb.Replace(@"HKEY_CLASSES_ROOT\", "");
// Open the CLSID\{guid} key for write access RegistryKey k = Registry.ClassesRoot.OpenSubKey(sb.ToString(), true);
// And create the 'Control' key - this allows it to show up in // the ActiveX control container RegistryKey ctrl = k.CreateSubKey("Control"); ctrl.Close();
// Next create the CodeBase entry - needed if not string named and GACced. RegistryKey inprocServer32 = k.OpenSubKey("InprocServer32", true); inprocServer32.SetValue("CodeBase", Assembly.GetExecutingAssembly().CodeBase); inprocServer32.Close();
// Finally close the main key k.Close(); }
[ComUnregisterFunction()] public static void UnregisterClass(string key) { StringBuilder sb = new StringBuilder(key); sb.Replace(@"HKEY_CLASSES_ROOT\", "");
// Open HKCR\CLSID\{guid} for write access RegistryKey k = Registry.ClassesRoot.OpenSubKey(sb.ToString(), true);
// Delete the 'Control' key, but don't throw an exception if it does not exist k.DeleteSubKey("Control", false);
// Next open up InprocServer32 RegistryKey inprocServer32 = k.OpenSubKey("InprocServer32", true);
// And delete the CodeBase key, again not throwing if missing k.DeleteSubKey("CodeBase", false);
// Finally close the main key k.Close(); }
#endregion } } |
-
위의 COM 구성요소를 작성할 때 주의 할 것은 클래스의 Attribute에 ProgId, ClassInterface, Guid 를 사용한 것이다.
ProgId는 asp 같은 애플리케이션에서 이 어셈블리를 접근 할 때 사용할 대표 이름을 지정하는 것이다. 이름은 프로젝트 이름 혹은 어셈블리 이름과 같을 필요는 없다. 주의할 점은 ProgId는 39자로 제한되어 있고 마침표 이외의 다른 문장 부호를 포함할 수 없다. 그리고 지정되어 있는 Guid Attribute의 경우 COM 구성요소에 등록된 Guid를 미리 지정하는 것이다. 만일 Guid Attribute를 지정하지 않으면 자동으로 할당 되어 등록 된다.
|
[ProgId("Sample.Crypto")] [Guid("781C3FAF-C274-4865-A2F8-C87CE5F2E2AF")] public class CipherHelper { } |
- 어셈블리는 regasm.exe를 이용해 COM 구성요소에 등록 할 때 ComRegisterFunction Attribute가 지정된 메소드를 찾아 그 내용을 참조 하여 등록 하게 된다. 아래 코드는 COM 구성 요소에 대한 기본 사항을 등록 하기 위한 코드이다. 또한 제거 할 때는 ComUnregisterFunction Attribute 가 기정된 메소드를 찾아 수행을 한다. 두 가지 메소드는 반드시 지정돼 있어야 하고 static 메소드로 구현 되어야 한다.
|
[ComRegisterFunction()] public static void RegisterClass(string key) { // Strip off HKEY_CLASSES_ROOT\ from the passed key as I don't need it StringBuilder sb = new StringBuilder(key); sb.Replace(@"HKEY_CLASSES_ROOT\", "");
// Open the CLSID\{guid} key for write access RegistryKey k = Registry.ClassesRoot.OpenSubKey(sb.ToString(), true);
// And create the 'Control' key - this allows it to show up in // the ActiveX control container RegistryKey ctrl = k.CreateSubKey("Control"); ctrl.Close();
// Next create the CodeBase entry - needed if not string named and GACced. RegistryKey inprocServer32 = k.OpenSubKey("InprocServer32", true); inprocServer32.SetValue("CodeBase", Assembly.GetExecutingAssembly().CodeBase); inprocServer32.Close();
// Finally close the main key k.Close(); }
[ComUnregisterFunction()] public static void UnregisterClass(string key) { StringBuilder sb = new StringBuilder(key); sb.Replace(@"HKEY_CLASSES_ROOT\", "");
// Open HKCR\CLSID\{guid} for write access RegistryKey k = Registry.ClassesRoot.OpenSubKey(sb.ToString(), true);
// Delete the 'Control' key, but don't throw an exception if it does not exist k.DeleteSubKey("Control", false);
// Next open up InprocServer32 RegistryKey inprocServer32 = k.OpenSubKey("InprocServer32", true);
// And delete the CodeBase key, again not throwing if missing k.DeleteSubKey("CodeBase", false);
// Finally close the main key k.Close(); } |
-
여기 까지 작업 한 후 어셈블리를 컴파일 한다. 컴파일이 성공적으로 끝난 후 명령 커맨드를 이용해 출력 경로로 이동 한 후 컴파일 된 어셈블리를 gacutil을 이용해 GAC에 등록 하고 regasm을 이용해 COM 구성 요소에 등록 한다. GAC에 등록하는 이유는 앞에 설명 한 것과 같이 어떤 애플리케이션에서도 사용할 수 있게 하고 코드를 보안 하기 위함이다.
- 이렇게 한 후 아래와 같이 asp 페이지를 만들어 브라우저를 통해 실행 해 보면 잘 수행 되는 것을 확인 할 수 있다.

|
<% Dim objActivex Dim key, iv, plainText, cipherText
set objActiveX = CreateObject("Sample.Crypto") key = objActiveX.GetKey() iv = objActiveX.GetIV() cipherText = objActiveX.Encrypt("암호화할 문자열", key, iv) plainText = objActiveX.Decrypt(cipherText, key, iv)
Response.Write("Key = [" & key & "]") Response.Write("<br>") Response.Write("IV = [" & iv & "]") Response.Write("<br>") Response.Write("암호문 = [" & cipherText & "]") Response.Write("<br>") Response.Write("평문 = [" & plainText & "]") Response.Write("<br>") %> |

ActiveX 만들기
- 만일 지금 만든 COM을 ActiveX컨트롤로 변경을 하고자 한다면 COM 구성요소 클래스 인 CipherHelper.cs 의 상속을 System.Windows.Forms.UserControl로 상속 관계를 바꾸고 해당 어셈블리를 참조를 추가 한다. 그리고 ClassInterface Attribute 를 추가한 후 컴파일을 하면 ActiveX로 사용할 수 있다.
|
[ProgId("Sample.Crypto")] [ClassInterface(ClassInterfaceType.AutoDual)] [Guid("781C3FAF-C274-4865-A2F8-C87CE5F2E2AF")] public class CipherHelper : UserControl { } |
-
위와 같이 변경 한 후 regasm, gacutil을 이용해 COM 구성 요소 및 GAC에서 제거 한 후 다시 등록하면 ActiveX로 사용할 수 있다. ActiveX를 테스트 할 수 있는 tstcon32.exe를 이용해 컨트롤을 테스트 할 수 있다.
- UserControl을 상속 받지 않으면 tstcon32.exe를 이용해 테스트를 할 수 없다.

tlb 만들기
- 위의 두 가지 방법은 일반 COM 구성요소로 만들거나 혹은 ActiveX로 만들어 인터페이스를 하는 경우이고 지금 하려는 것은 .NET으로 만들어진 COM을 Visual C++, VB, Delphi에서 사용하는 방법을 설명하려는 것이다. 이런 Native 언어에서는 .NET으로 만들어진 어셈블리는 타입이 틀리기 때문에 바로 사용할 수 없기 때문에 tlb을 이용해 인터페이스를 해야만 한다.
- tlb를 만들기 위해서는 regasm을 이용해 COM 구성요소에 등록 할 때 /tlb 옵션을 사용하면 파일이 만들어 진다. 이렇게 단순히 tlb 파일만 만들어 졌다고 바로 인터페이스 할 수 있는 것이 아니고 위의 코드를 변경 해야만 한다. 코드를 변경하는 기준 첫 번째 예제인 COM 구성 요소 만들기부터 이다. 우선 프로젝트에 ICipherHelper.cs 인터페이스를 하나 추가 한 후 아래와 같이 코딩 한다.
|
using System; using System.Collections.Generic; using System.Text;
namespace Sample.Crypto { public interface ICipherHelper { string Encrypt(string plainText, string key, string iv);
string Decrypt(string cipherText, string key, string iv);
string GetKey();
string GetIV(); } } |
- 이렇게 만들어진 Interface를 이용해 그 전에 만들어졌던 CipherHelper.cs 클래스의 상속 관계를 아래와 같이 변경 한다.
|
[ProgId("Sample.Crypto")] [ClassInterface(ClassInterfaceType.AutoDual)] [Guid("781C3FAF-C274-4865-A2F8-C87CE5F2E2AF")] public class CipherHelper : ICipherHelper {
} |
-
여기 까지 작업을 하면 모든 작업을 완료 한 것이다. 자 이제 그 전에 등록되었던 COM을 삭제 하고, 다시 등록 하도록 하자. 명령 커맨드에서 아래와 같은 명령을 차례로 수행한다.
이제 tlb를 이용해 COM 구성요소를 등록하게 되면 향후 제거 할 때는 /tlb 옵션을 줘서 제거 해야만 Registry가 깨끗해 질 것이다.
|
gacutil /u Sample.Crypto regasm /u Sample.Crypto.dll gacutil /I Sample.Crypto.dll regasm /tlb Sample.Crypto.dll |
- 자 이제 C++ 에서 어떻게 사용하는지 확인해 보자. 우선 간단한 C++ 애플리케이션을 하나 만든다. 그리고 하나의 버튼에 이벤트를 걸고 아래와 같은 코딩을 하게 되면 실제 타입 라이브러리를 통해 COM 구성요소와 인터페이스를 하는 예제를 확인 할 수 있다.
|
#import "C:\Documents and Settings\Administrator\My Documents\Visual Studio 2008\Projects\Sample.Crypto\Sample.Crypto\bin\Debug\Sample.Crypto.tlb" raw_interfaces_only using namespace Sample_Crypto;
void CTestApp4Dlg::OnBnClickedOk() { HRESULT hr = CoInitialize(NULL); ICipherHelperPtr ICipher(__uuidof(CipherHelper));
BSTR Result = SysAllocString(L"KEY값");
hr = ICipher->GetKey(&Result);
SysFreeString(Result); CoUninitialize();
OnOK(); } |
결론
.NET 에서 COM 구성요소를 만들기 위한 가장 키 포인트를 정리 하면
- 프로젝트 속성의 ComVisible = true로 설정
- COM 구성요소로 노출한 클래스의 "ProgId", "ClassInterface", "Guid" Attribute 추가 작업
- 노출할 Interface를 작업해 상속 관계 정리
- regasm.exe를 이용해 등록 시 /tlb 옵션 사용
이라 할 수 있겠다.
2009년 10월 30일 Tomorrow Halloween .NETer
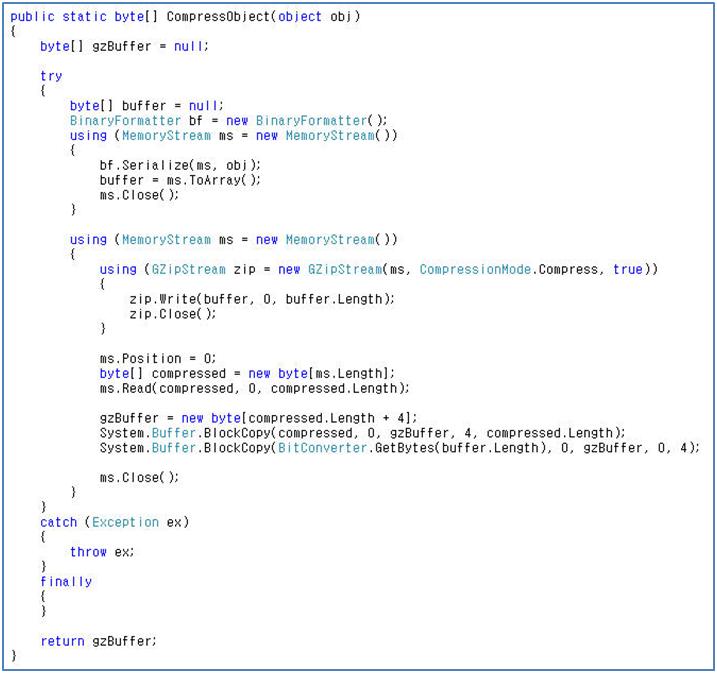

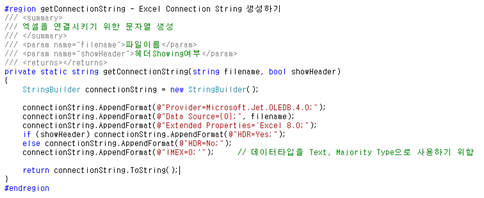
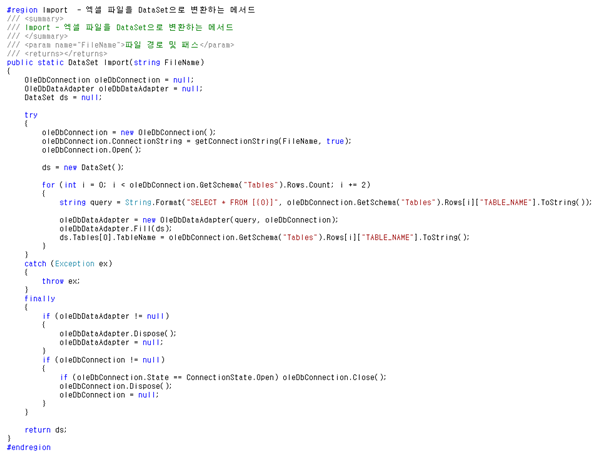

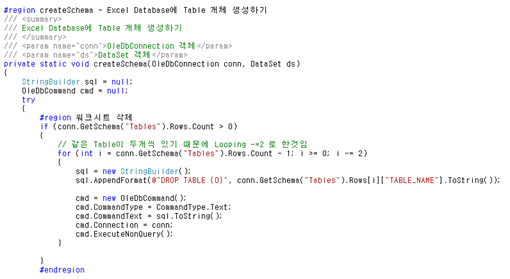

 Excel.cs
